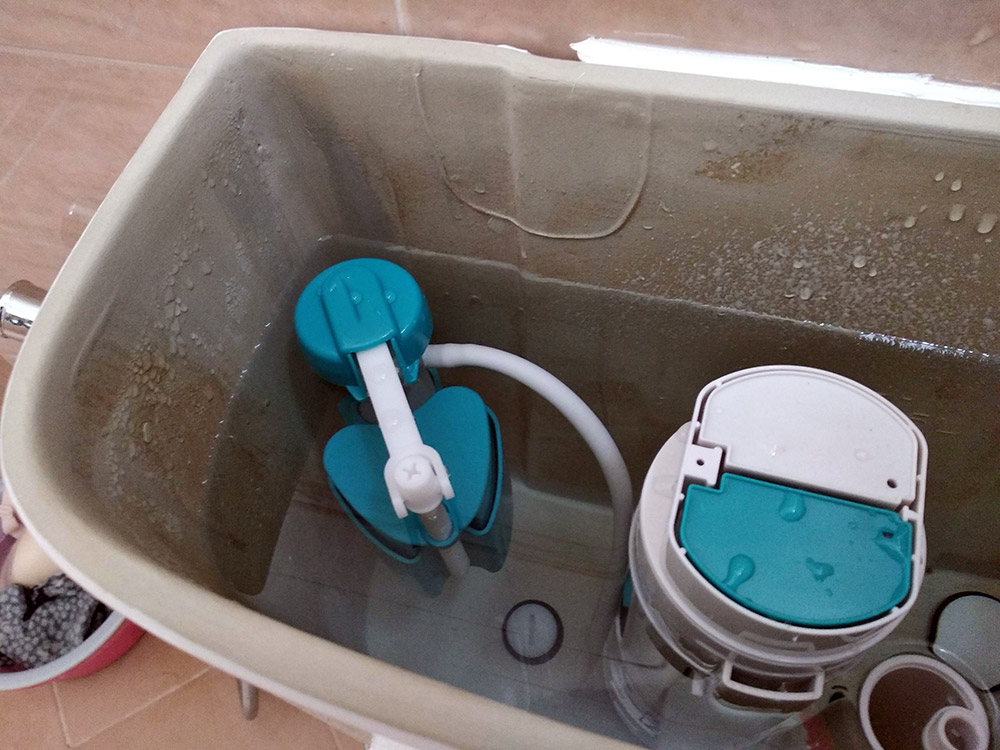
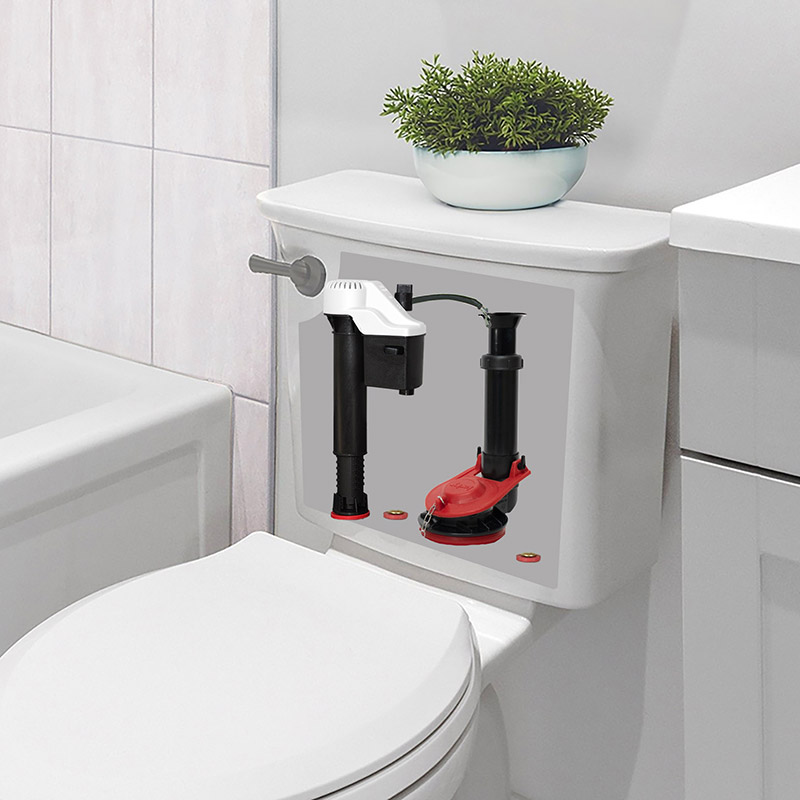
When you encounter a toilet that won’t flush, it can be more than just a minor inconvenience; it disrupts your daily routine. Understanding how a toilet flush works is the first step to solving this unwanted puzzle. The process is a coordinated effort involving several key components: the bowl, the tank, the flapper, the fill valve, and the lift chain. Each part plays a crucial role in the symphony that is a successful flush. Among these components, the water level in the tank is vital—a low water level can silence the entire ensemble.
In this educational overview, we’ll dive into the workings of your toilet’s flushing mechanism and what you need to know to get things flowing smoothly again.
In this guide:
- Clogged Toilet: The First Suspect
- Flapper Issues: The Silent Saboteur
- Broken Lift Chain: A Simple yet Crucial Component
- Low Water Level in the Tank: Inadequate Flush Power
- Faulty Fill Valve: When Refilling Goes Wrong
- Blocked Vent Pipes: The Hidden Culprit
- Septic System Problems: Beyond the Toilet
- Get Your Fast Quote Today!
Clogged Toilet: The First Suspect
When your toilet won’t flush, a clog in the bowl is often the primary culprit. This common issue can cause water to rise dangerously high or not drain properly. Identifying and addressing a clog promptly can prevent potential overflows and water damage.
How to Identify a Clog in the Bowl
To determine if you have a clogged toilet, look for these signs:
- Water rises to the top of the bowl and drains slowly, or not at all.
- Strange gurgling noises coming from the plumbing.
- Water level in the toilet bowl fluctuates significantly.
- Attempts at flushing result in water backup or overflow.
DIY Methods for Unclogging a Toilet Using a Plunger or a Plumber’s Snake
Using a Plunger:
- Ensure the plunger has a flange, which is more effective for toilets.
- Insert the plunger into the bowl and push down gently to remove the air.
- Pump the plunger vigorously several times, maintaining the seal.
- After several pumps, pull the plunger up sharply to disturb the clog.
- Flush the toilet to check if the clog is cleared.
Using a Plumber’s Snake (or Toilet Auger):
- Insert the end of the auger into the toilet bowl, aiming for the drain.
- Turn the handle in a clockwise direction to extend the coil.
- Once you encounter resistance, continue to turn and push until it feels like the clog has been broken up or snagged.
- Retract the auger, clean the cable, and flush the toilet to clear the debris.
Flapper Issues: The Silent Saboteur
When a toilet won’t flush, the problem might not always be apparent. One often overlooked component is the toilet flapper—the silent saboteur that can disrupt your toilet’s functionality. Let’s delve into the pivotal role of the flapper and explore common issues that can arise, potentially impacting your toilet’s ability to flush properly.
The flapper in your toilet is a vital component within your flushing mechanism that controls the water flow from the tank into the bowl. Upon pressing the flush lever, the flapper lifts, allowing water to rush into the bowl and facilitate the flush. When the flapper doesn’t function correctly, it can spell trouble for the entire flushing process.
Common Flapper Problems
Over time, flappers succumb to wear and tear which can lead to an improper seal of the water in the tank. Problems can include:
- Wear and Tear: Due to its exposure to water continuously, the flapper material can degrade, leading to cracks or decay.
- Improper Seal: If the flapper doesn’t seal properly, water can leak from the tank into the bowl, preventing a strong flush.
- Water Level Implications: A compromised flapper can affect the water level in the tank, which is crucial for a good flush.
Step-by-Step Guide to Diagnosing and Replacing the Flapper
Identifying and fixing flapper issues can be manageable with a few simple steps:
- Remove the tank lid and observe the flapper. If it appears warped, discoloured, or damaged, it’s likely time for a replacement.
- Turn off the water to the toilet at the shut-off valve, typically located on the wall behind or near the base of the toilet.
- Flush the toilet to drain the tank of water.
- Unhook the flapper from the pegs on the overflow tube and disconnect the chain from the flush lever.
- Bring the old flapper to your local hardware store to ensure you purchase a compatible replacement.
- Attach the new flapper to the pegs and reconnect the chain, allowing for some slack, but not too much.
- Turn the water back on, let the tank refill, and test the flush. Adjust the chain as needed for proper operation
Broken Lift Chain: A Simple yet Crucial Component
If you’re puzzled by your toilet’s refusal to flush, the lift chain may be the culprit. This small part can have a significant impact on your toilet’s functionality. The lift chain is responsible for connecting the flush lever to the flapper. When the lift chain breaks or disconnects, the flapper doesn’t lift, and the toilet won’t flush.
When the chain is intact and properly connected, pressing the flush handle pulls the chain and lifts the flapper. This releases water from the tank to the bowl, initiating the flush. A broken or detached chain means the flapper won’t budge, halting the flush before it starts.
Instructions for Reconnecting or Replacing a Lift Chain
- Turn off the water to the toilet and flush to empty the tank.
- Remove the lid of the toilet tank and locate the broken or detached chain.
- If the chain is broken, purchase a replacement that’s compatible with your toilet model.
- Attach the new chain to the flush lever arm and the flapper with the respective clips provided.
- Ensure that the chain has some slack when the flapper is closed. Adjust if necessary.
- Test the chain’s length by flushing a few times to confirm that the flapper fully opens and closes without impediment.
- Once adjusted and working, turn the water back on.
Tips for Ensuring the Correct Length and Tension of the Chain
Ensuring the correct length and tension of the lift chain is important for optimal toilet operation:
- A chain that’s too short may prevent the flapper from fully sealing, leading to a running toilet.
- A chain that’s too long can get caught under the flapper and also cause leaks, or it might not lift the flapper high enough to start a flush.
- There should be about 1/2 inch of slack in the chain with the flapper closed to ensure proper function.
- After any adjustments, always double-check the flapper’s operation before completing the job.
Low Water Level in the Tank: Inadequate Flush Power
One commonly overlooked cause of a toilet’s failure to flush is the water level within the tank. Not having enough water can lead to inadequate flush power, leaving you with an unflushed toilet and frustration. Let’s explore how to troubleshoot this issue and regain your toilet’s proper function.
The water stored in your toilet tank is instrumental for a successful flush. When you activate the flush handle, the water is released, creating a surge that pushes waste from the bowl into the sewer line. If the water level is too low, this surge is insufficient, leading to a weak flush, or in some cases, no flush at all. Ensuring the correct water level is, therefore, crucial for your toilet’s effective operation.
Troubleshooting Guide for Adjusting Water Level in the Tank
To resolve a low water level issue, follow this simple troubleshooting guide:
- Remove the tank lid and place it in a safe location to avoid breakage.
- Locate the float device, which regulates the water level. This can be a ball float or a cup-style float, depending on your toilet model.
- Check if the float is stuck or obstructed, which could prevent it from rising to the proper level. If so, gently adjust it to release any clogs or debris.
- If the float moves freely, look for an adjustment screw or clip that can be used to modify the water level. Turning the screw clockwise typically raises the water level, while counterclockwise will lower it.
How to Check the Water Level and Make Necessary Adjustments
If you’re unsure what the proper water level should be, look for a marker on the inside of the tank indicating the optimal level. This is usually about an inch below the top of the overflow tube. To adjust the water level:
- Gently bend the float arm up to increase the water level, if you have a traditional ball float (being careful not to snap the arm).
- For cup-style floats, slide the float up the central column to raise the water level.
- Turn the adjustment screw as indicated in the troubleshooting guide.
After making adjustments, flush the toilet to ensure the water level is now adequate. Make further adjustments if necessary, and monitor the flush power for improvement.
If, after these adjustments, the water level and flushing power are still insufficient, other issues may be at play, such as a faulty fill valve or blocked vent pipes, which will require further inspection.

Faulty Fill Valve: When Refilling Goes Wrong
One often-overlooked reason your toilet won’t flush properly is a faulty fill valve. The fill valve, responsible for refilling your toilet tank post-flush, can significantly impact the water level and your toilet’s ability to flush if it’s not working correctly.
Identifying Issues with the Fill Valve
To diagnose fill valve troubles, it’s crucial to observe the behavior of the valve. A problematic fill valve may cause the tank to either not refill at all, refill slowly, or continue running indefinitely, which can lead to a significant waste of water.
If you hear a hissing sound, it could indicate a dislodgment or wear and tear on the fill valve. A malfunctioning valve can also disrupt the delicate balance of water needed for an effective flush, leading to repeated flushing problems and water wastage.
How to Test and Replace a Faulty Fill Valve
Testing the fill valve is straightforward:
- Remove the toilet tank lid.
- Flush your toilet and observe if the tank refills to the correct water level.
- If the water runs continuously or fails to reach the fill line, your fill valve may need replacing.
Before you replace the fill valve, ensure you turn off the water supply to the toilet. Empty the tank and then remove the old valve, typically attached to the bottom of the tank. Follow the instructions provided with your new fill valve to install it properly, or consider consulting with a professional plumber.

Blocked Vent Pipes: The Hidden Culprit
When troubleshooting a toilet that won’t flush properly, blocked vent pipes are often overlooked. These pipes play a significant role in your home’s plumbing system, allowing air to enter the plumbing system to maintain proper drainage flow. They also help regulate air pressure to allow waste water to flow out correctly, preventing vacuum scenarios that can disrupt your toilet’s functionality.
Symptoms of Blocked Vent Pipes
How do you know if a vent pipe is causing your flushing woes? Here are a few telltale signs:
- Gurgling sounds coming from toilets while showering or after flushing
- Slow drainage or water backing up in sinks, bathtubs, or showers
- Sewage odours emanating from drains
- Wastewater coming out from the base of the toilet
Advice on Clearing Vent Pipe Obstructions Safely
Clearing a blocked vent pipe is not for the faint-hearted and might require professional intervention. However, should you decide to tackle it yourself, here are some steps you can take:
- Locate your vent pipe – typically, it can protrude from the roof.
- Inspect the vent opening for obvious obstructions such as leaves, bird nests, or other debris.
- Use a plumber’s snake to dislodge any obstructions within the pipe gently. Exercise caution to prevent damage to the pipe lining.
- Consider using a garden hose to flush the vent if the obstruction isn’t too far down. Again, be cautious and do not use high water pressure, as it can cause more issues.
- If the problem persists, it may be time to call a professional plumber to assess and fix it properly.
Septic System Problems: Beyond the Toilet
When you face flushing issues with your toilet, it’s crucial to consider factors extending beyond the immediate toilet mechanics. One significant aspect is the condition of your septic system, which plays a vital role in waste management for your home. A malfunctioning septic system can lead to a slew of problems, including a toilet that won’t flush properly.
Understanding Septic System Components
The septic system comprises various elements, each essential for processing household waste. Here’s a brief overview:
- Septic tank: This is where waste is separated and begins to break down.
- Drain field: This is where filtered waste water seeps back into the ground safely.
- Pipes and conduits: They connect your household plumbing to the septic system.
Issues with any of these components can lead to a backup, causing your toilet to malfunction.
Signs of Septic System Problems
Recognising the signs of a troubled septic system early can save you from a full-fledged plumbing disaster. Here’s what to watch for:
- Unpleasant odours are emanating from drains or the area around the septic system.
- Slow-draining sinks and toilets, not just in one area of the house.
- Gurgling sounds within the plumbing system.
- Water pooling or unusually lush vegetation near the septic tank or drain field.
Addressing a non-flushing toilet often involves checking for clogs, inspecting flapper conditions, and ensuring proper water levels and valve functionality. While DIY methods can resolve some issues, complex problems may require professional expertise. Don’t hesitate to contact True Flow Plumbing and Drains for reliable and efficient toilet repairs. Their experienced plumbers can swiftly diagnose and fix any toilet troubles, restoring your bathroom’s functionality with minimal hassle.


