
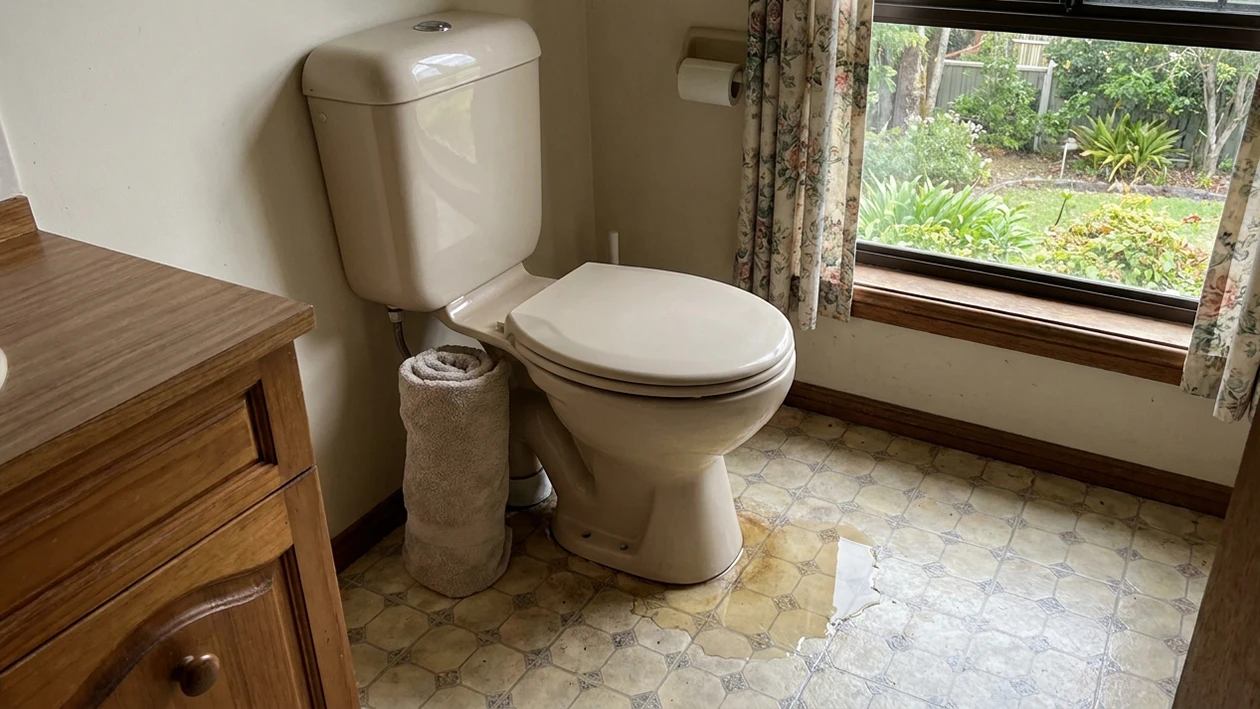
A toilet leaking at the base is caused by a failed floor seal (the rubber pan collar or wax ring) or loose floor bolts, which lets wastewater escape every time you flush. It’s an emergency. Stop using the toilet, shut off the water supply valve, and get the floor seal replaced before the water works its way into your subfloor.
G’day, Dylan here from TrueFlow Plumbing and Drains. I’ve pulled up a lot of toilets across the Central Coast, and the base leak is the one people put off the longest because the puddle looks small and harmless. It isn’t.
Is a toilet leaking at the base an emergency? (And can I still use it?)
Yes, it’s an active emergency, and no, you shouldn’t keep using it.
The water pooling around the base is black water. That’s sewage, not clean water. It carries a real health risk, and because it seeps under the flooring rather than sitting on top of it, every flush pushes more of it into your subfloor. Timber joists rot, particleboard swells, and mould takes hold in the cavity where nobody can see it.
Do this now
- Stop using the toilet. Every flush makes it worse.
- Turn off the water supply. The isolation valve is usually on the wall behind or beside the pan. Turn it clockwise until it’s firm. If there’s no isolation valve, or it’s seized, here’s how to turn off your water mains supply.
- Flush once. This empties the cistern so nobody flushes it out of habit.
- Sanitise the area. Gloves on. Clean the visible water with bleach and disposable paper towel, then bin the towel.
Why the first 24 hours matter more than people think
There’s a reason I push people to move on this the same day rather than leaving it for the weekend.
WA Health has published guidance on sewage spills inside homes, and it draws a hard line at 24 hours. It’s only a low-risk clean-up if three things are all true. The water has stayed on the tiles. It’s been under 24 hours. And nobody vulnerable lives there.
Once you pass the 24 hour mark, or the water tracks past the bathroom door, or there’s a child under 4, an adult over 75, a pregnant woman or anyone immunocompromised in the house, the risk rating steps up automatically. At that point the recommended response is no longer a mop and a bucket. It’s a specialist restoration crew, the council’s health officer, and a conversation about whether you can still sleep in the house.
Same puddle. One extra day. Much bigger job.
Source: WA Department of Health, Interim Guidance for the Notification and Risk Management of Sewage Overflows into Buildings, 2018.
Working out what’s actually leaking
- Water appears only when you flush: the floor seal has failed. The pan needs to be lifted and reseated.
- Water is there constantly, with no flushing: it’s coming from above. Usually a faulty water supply line, a failed cistern-to-pan seal, or a hairline crack in the porcelain that’s tracking down the outside of the bowl. If the cistern is also refilling on its own, start with a toilet that keeps running instead.
Run your hand dry along the supply line and the join between the cistern and the pan before you assume it’s the floor seal. It saves pulling up a toilet that didn’t need it. If you still can’t place where the water is coming from, our guide on how to find a water leak walks through the same process for the rest of the house.
How can I fix a toilet that is leaking from the base?
To stop it permanently you have to remove the toilet, scrape away the old degraded seal, and fit a new one before bolting the pan back down. There’s no shortcut that lasts.
What you’ll need
Adjustable spanner, putty knife or scraper, heavy-duty gloves, bucket, sponge, new rubber pan collar (or wax ring, depending on your setup), and new floor bolts. Buy the bolts new. The old ones are almost always corroded.
Step 1: Drain the system. Water off at the isolation valve. Sponge out every last bit of water from the bowl and the cistern into your bucket. Any water left in there ends up on your floor.
Step 2: Disconnect. Undo the water supply line at the cistern. Unscrew the nuts on the floor bolts at the base of the pan. If they’re seized, penetrating oil and patience beat force every time.
Step 3: Lift the pan. Straddle it, rock it gently side to side to break the old seal, then lift straight up. Straight up, not tilted. Lay it on its side on an old towel where it won’t get knocked.
Step 4: Clean and prep. Scrape 100% of the old wax or rubber off both the floor flange and the underside of the pan. Not most of it. All of it. Old seal material left behind is the single most common reason a reseat leaks again a week later. The same approach works here as removing old plumber’s putty. Stuff a rag in the open waste pipe while you work so nothing falls in and sewer gas stays put.
Step 5: Fit the new seal. Set the new pan collar or wax ring squarely onto the floor flange, then drop the new floor bolts into the slots.
Step 6: Reseat and tighten. Lower the pan straight down over the bolts in one movement. Put your body weight on it to compress the seal. Tighten the nuts alternately, left then right, a bit at a time so it pulls down evenly. Snug is enough. Porcelain cracks a lot easier than people expect. The full process is covered in our guide on how to install a toilet.
The two mistakes I see most
- Overtightening the floor bolts. Tighten until snug, then a final quarter turn. That’s it. Crack the pan and you’re buying a new toilet.
- Lifting or tilting the pan after you’ve set it down. Once the seal is compressed, it’s done. If you lift it to adjust the position, that seal is finished and you need a new one. Line it up before it goes down, not after.
How to know it worked
Turn the water back on and let the cistern fill. Flush three times, and between each flush lay dry paper towel flat on the floor right around the base. Bone dry towels after all three flushes means you’re watertight. Any damp patch at all means the seal isn’t seated and it needs to come back up.
What’s the best sealant for a toilet base? (The silicone myth)
Never use silicone or sealant to fix a leaking toilet base. Silicone is for appearance and odour control, and it only goes on after the internal seal is watertight.
Here’s why it’s so damaging. Sealing around the outside of the base builds a dam. The broken seal underneath is still leaking every flush, but now the wastewater can’t escape onto the tiles where you’d see it. So it goes the only way left, which is down. Into the floorboards, into the joists, and eventually through the ceiling below. The puddle disappearing feels like a fix. It’s the opposite.
| Action | Immediate result | Long-term result | Recommendation |
|---|---|---|---|
| Silicone around the outside | Puddle disappears | Rotted subfloor, black mould, ceiling damage | Never do this to fix a leak |
| Replace the internal seal | Puddle disappears | Watertight, sound floor | Always do this |
The part almost nobody knows: your bathroom floor can’t dry itself out
It’s also why a bathroom floor is slower to recover than a leak anywhere else.
Timber only rots once its moisture content reaches 20% or higher. Below that line it can stain and go mouldy on the surface, but actual decay won’t start, and it won’t keep going if it has already begun. Above 20% and the conditions are right for decay, especially in untreated pine framing.
Your bathroom floor has a waterproofing membrane under the tiles, or seamless vinyl over the top. That’s a requirement in any bathroom built or renovated in recent decades, and it’s doing exactly what it should when it stops water soaking down into the timber. But once water is already down there, escaping under the pan on every flush, that same membrane stops the timber drying back out. Forest and Wood Products Australia’s technical guidance notes that these waterproofing systems significantly slow the drying of the timber underneath.
So the subfloor sits above that 20% line, day after day, with nowhere for the moisture to go. Running silicone around the outside of the pan just puts a second lid on a floor that already can’t breathe.
Source: WoodSolutions Technical Design Guide 12, Impact and Assessment of Moisture-affected Timber-framed Construction, Forest and Wood Products Australia.
Plumber’s rule of thumb: only run a bead of anti-fungal sanitary silicone around the base after the floor seal has been replaced and tested. And leave a gap of around 50mm at the back un-sealed, so if a seal ever fails again the water shows up on your floor instead of quietly destroying it.
When to call a licenced plumber
Call rather than DIY if:
- The pan is cracked (here’s when you need a new toilet rather than a repair)
- The floor flange is broken or sitting below floor level
- The floor already feels spongy underfoot
- The leak is continuous rather than flush-triggered
- You’ve reseated it and it still weeps
- The bowl is filling up and spilling over rather than leaking at the base, which is an overflowing toilet and usually a blocked toilet further down the line
In NSW, work on sanitary drainage is licenced work. A tap washer you can do yourself. Pulling a pan off the waste and reconnecting it is a job for a licenced plumber, both legally and because a seal that isn’t sitting square will leak again within weeks. Our guide on DIY plumbing covers what you can and can’t legally take on yourself.
That’s the part of this job I’d rather do for you than have you redo twice. I’m licenced and insured, NSW Licence No. 457032C. Master Plumbers accredited. I’ve been looking after Central Coast homes since 2018. I charge per job, not per hour, so you know the price before I start, and every bit of my labour is covered by a Lifetime Labour Guarantee. Seniors Card holders get 10% off.
If your toilet is leaking at the base right now, don’t wait for it to dry out on its own. It won’t. I’m available 24/7 as an emergency plumber right across the Central Coast.
Call Dylan on 0411 438 760 or request a free quote.